
How do I connect my Brownrice registered domain to Squarespace?
Step 1 - Start the connection in Squarespace
The following steps must be done within your SquareSpace account.
To connect your domain, start in the Domains panel :
-
Open the Domains panel . Or, if there's a ? in the top-left corner, open that menu and click Domains .
-
Click Use a Domain I Own .
-
Enter the full domain name you're connecting in the Enter Domain field, then click the arrow.
-
Click Connect Domain .
-
Select your domain provider from the drop-down menu. For a Brownrice registered domain, select Other . You can still connect your domain if your provider isn't in the list.
-
Click Connect Domain .
-
In the message that appears, click Continue .
Step 2 - View your DNS settings in Squarespace
The following steps must be done within your SquareSpace account.
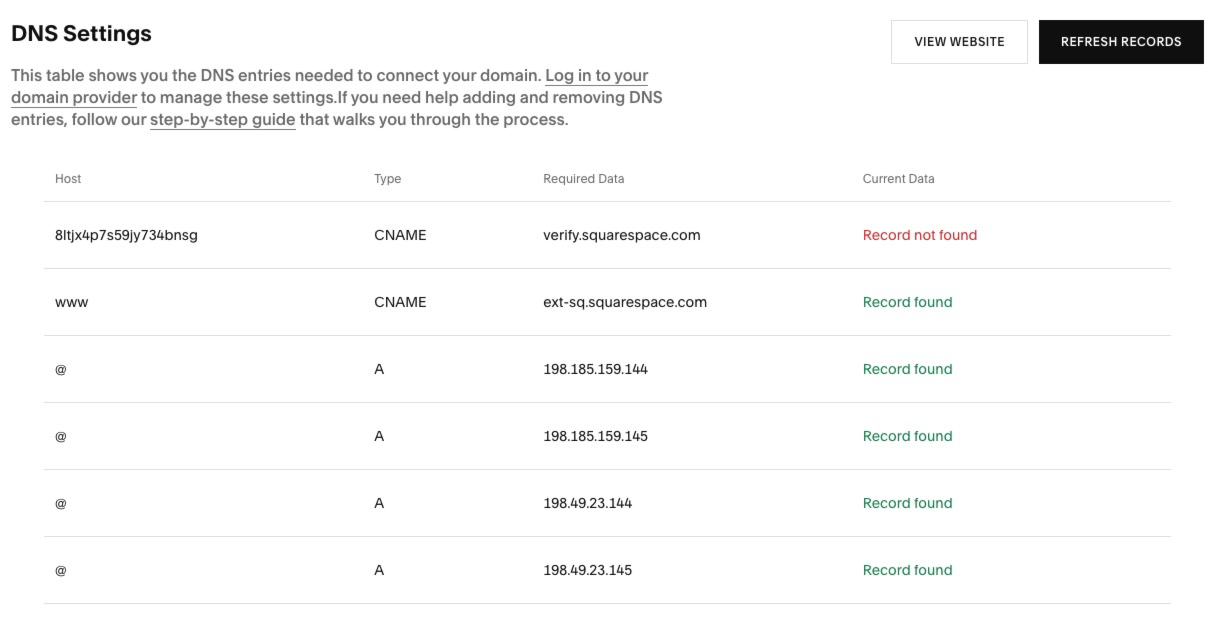
After you click connect, the DNS Settings panel will appear. This panel shows the records you need to enter in your Brownrice account to connect your domain to your Squarespace site. Keep this panel open for your reference.
Your domain records may be green or red, depending on the DNS information that the Squarespace system receives from your Brownrice. Since no records are setup on Brownrice's end yet, these should all be red at this time.
The page will look like this, however be sure to use your unique Squarespace DNS settings and not those shown in the screenshot below:
Step 3 - Log into your Brownrice Dashboard and setup the required DNS records
The following steps must be done within your Brownrice account.
- In a new browser tab or separate window, navigate to https://dashboard.brownrice.com and login to your Brownrice dashboard
Note: The email address you signed up with is the email you will use to sign-in. If you don't know your password you can reset it here. - Navigate to the "DNS" page using the navigation bar at the top of the page:

- Click the green "Manage DNS" button next to the domain that you are pointing to Squarespace. If no DNS is setup yet, go ahead and click the prompt to "Setup DNS on brownrice servers":

- With DNS setup on our servers, you should get to a DNS zone editor page like this:

- Click the green "Edit DNS Records" button, this will allow you to edit existing records as well as add new ones. This is where you will input your unique Squarespace records.
Step 4 - Add the first CNAME Record
The following steps must be done within your Brownrice account, using the DNS settings provided from SquareSpace in step 2.
In the first line of your Squarespace DNS Settings, copy the unique code that appears directly below the Host column. The unique code is a random string of numbers and letters that must point to verify.squarespace.com.
In the Brownrice DNS manager, create a CNAME with these values:
| Host Name | Type | Address |
| Copy and paste the unique code under Host on the first line. | CNAME | verify.squarespace.com |
Note: If you don't add this CNAME, or if it's entered incorrectly, the domain will unlink from your site after 15 days. If this happens, you can start over to reconnect the domain.
Step 5 - Add the second CNAME Record
The following steps must be done within your Brownrice account, using the DNS settings provided from SquareSpace in step 2.
In the second line of your Squarespace DNS Settings, www appears directly below the Host column. This record must point to ext-cust.squarespace.com
You should already have a CNAME set up in Brownrice with a www Alias. If so, edit this existing CNAME so that www points to ext-cust.squarespace.com
Your CNAME value should look like this:
| Host Name | Type | Address |
| www | CNAME or CNAME Alias | ext-cust.squarespace.com |
Then, in Step 6, only add the three remaining A records.
Step 6 - Add the A records
The following steps must be done within your Brownrice account, using the DNS settings provided from SquareSpace in step 2.
In the last four lines of your Squarespace DNS Settings, you'll see four IP addresses in the Required Data column. Each of these displays @ in the Host column.
Your DNS through Brownrice will already have an A record in place for the root domain (bridashboard.com in this example). So, edit your existing A record for the root domain to be one of the 4 below, then create 3 additional A records for the root domain as shown:
| Host Name | Type | Address |
| @ | A | 198.185.159.144 |
| @ | A | 198.185.159.145 |
| @ | A | 198.49.23.144 |
| @ | A | 198.49.23.145 |
Within the Brownrice Dashboard, it should look like this all said and done:
Note: The other records are default Brownrice records for email, etc. They can be left as-is.
Step 7 - Wait for the connection to complete
That's it! It can take 24 to 72 hours for the connection to start working properly. While you wait you can review the connection's progress, and domain settings in the Domain overview panel within Squarespace.